

Introduction:
Ansible is an open-source automation tool that is commonly used for configuration management, application deployment, and task automation. It simplifies the process of managing and automating tasks on a large number of servers or network devices, making it a popular choice among system administrators, DevOps engineers, and IT professionals.
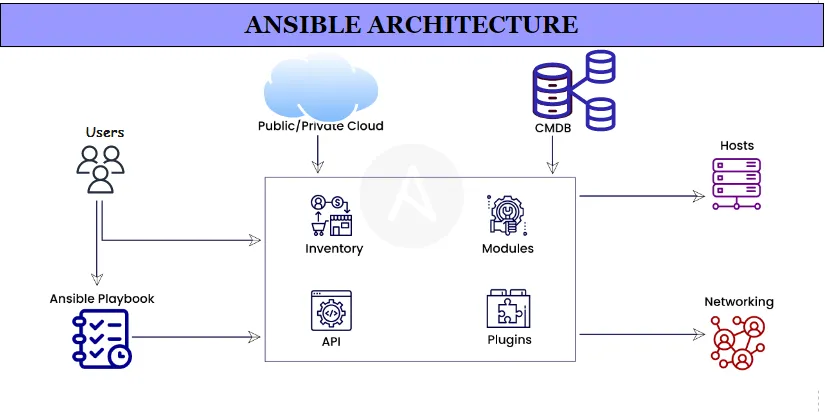
Ansible Zero to Hero – Ansible Architecture
- Client-Server Setup: Ansible employs a client-server architecture, with the server referred to as the control machine and the clients as nodes.
- Communication Protocols: The control machine communicates with the nodes using SSH (Secure Shell) for Unix-based systems or WinRM (Windows Remote Management) for Windows systems.
- Module-Based Tasks: Within the control machine, there exists a collection of modules that define specific tasks to be carried out on the nodes.
- Command Execution Flow: When a command is initiated on the control machine, it compiles the relevant module and transmits it to the nodes.
- Node Execution: The nodes, upon receiving the module, execute the defined task and subsequently provide feedback on the results back to the control machine.
Read Also – Docker registry setup and registration
Ansible Modules
Ansible Modules are essential components used to carry out specific tasks on remote systems. They enable automation and management of various operations, such as file management, package installation, and service configuration. Here’s a breakdown of the provided example using the file module:
Example: Creating a Directory on a Remote Host
- name: Create a directory
  hosts: webserver
  tasks:
    - name: Create a directory
      file:                   # Module name (file)
        path: /var/www/myapp  # Path to the directory to be created
        state: directory      # Specifies the desired state (in this case, "directory")
In this example playbook:
- – name: Create a directory: This is a human-readable label for the task, describing its purpose.
hosts: web server: It specifies the target hosts (in this case, the host group or individual host named ‘web server’) where the task will be executed.tasks: This section contains the list of tasks to be executed on the specified hosts.- – name: Create a directory: Another human-readable label for the specific task within the playbook.
- file:: This is the name of the Ansible module being used, in this case, the ‘file’ module.
- path: /var/www/myapp: The ‘path’ parameter specifies the location where the directory is to be created. In this case, it’s ‘/var/www/myapp’.
- state: directory: The ‘state’ parameter specifies the desired state of the directory. Here, it’s set to ‘directory,’ indicating that Ansible should create the directory if it doesn’t already exist.
In summary, this Ansible playbook utilizes the ‘file’ module to ensure that the ‘/var/www/myapp’ directory exists on the ‘web server’ host(s). If the directory doesn’t exist, Ansible will create it. This demonstrates how Ansible modules simplify automation tasks by providing clear, declarative instructions for various operations.
Ansible Playbooks:
- Definition: Playbooks are YAML files that outline the tasks to be executed by Ansible. They are employed to automate a wide range of operations, including application deployment, infrastructure management, and configuration management.
- Structure: Playbooks are structured into plays, with each play comprising multiple tasks. This hierarchical structure enables the automation of complex processes in a clear and organized manner.
Example Playbook: Installing Apache on a Remote Host:
- name: Install Apache
  hosts: webserver
  become: true
  tasks:
    - name: Install Apache
      apt:
        name: apache2
state: present- Play Name: “Install Apache” is a descriptive label for the play, clarifying its purpose.
- Hosts: The “hosts” parameter specifies the target host or host group (“webserver”) where the play will be executed.
- Privilege Escalation: “become: true” indicates that Ansible should escalate privileges (become root) before executing tasks. This is necessary for tasks like package installation on many systems.
- Tasks: The “tasks” section contains a list of tasks to be performed in the play.
- Task Name: “Install Apache” provides a name for the specific task within the play.
- Module and Operation: The “apt” module is used to manage packages on Debian-based systems. In this case, it is tasked with installing the “apache2” package.
- Desired State: The “state: present” parameter signifies that Ansible should ensure the “apache2” package is installed. If it’s not present, Ansible will install it.
In summary, this Ansible playbook, named “Install Apache,” orchestrates the installation of the Apache web server on the host(s) defined in the “webserver” group. It employs the “apt” module to manage packages and ensures that the “apache2” package is present on the target system(s).
Ansible Inventories:
- Definition: Inventories in Ansible are essentially lists of hosts that Ansible is responsible for managing. These lists can be static, where the host information is manually specified in a file, or dynamic, where Ansible dynamically discovers and populates the list of hosts to manage.
Example Static Inventory:
Here’s an example of a static inventory file:
[webservers]
webserver1 ansible_host=192.168.1.10
webserver2 ansible_host=192.168.1.11

[databases]
dbserver1 ansible_host=192.168.1.20
dbserver2 ansible_host=192.168.1.21
- Grouping Hosts: In this example, hosts are organized into two groups: “webservers” and “databases.”
- Host Definition: Each host entry includes a hostname (e.g., “webserver1” or “dbserver1”) and its corresponding IP address using the “ansible_host” parameter.
In summary, this static Ansible inventory file defines groups of hosts and associates them with their respective IP addresses. Ansible can use this inventory to target and manage these hosts based on the groups and their properties defined in the inventory file.
Ansible Commands:
- ansible: This command is used to execute commands on target hosts. It allows you to run ad-hoc tasks on remote servers.
- ansible-playbook: This command is used to execute Ansible Playbooks on target hosts. Playbooks are YAML files that define automation tasks.
- ansible-galaxy: This command is used for managing Ansible roles from the Galaxy repository. Roles are reusable sets of tasks and configurations.
Setting Up Ansible on an EC2 Instance:
Prerequisites:
- An EC2 instance running Amazon Linux or a compatible OS.
- A user with sudo privileges.
Step 1: Connect to the EC2 Instance:
- Connect to the EC2 instance using an SSH client (e.g., PuTTY).
- Ensure you are logged in as a user with sudo privileges.

Step 2: Update the Operating System:
- Run sudo yum update -y to update the operating system.
sudo yum update -y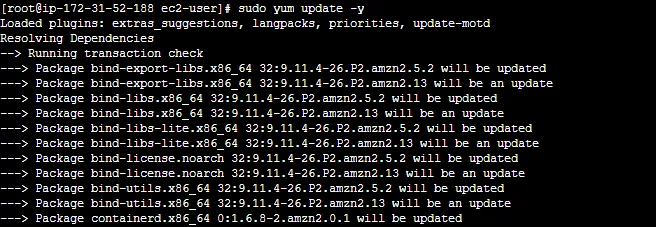
Step 3: Install Ansible:
- If using Amazon Linux 2, install the EPEL repository: sudo amazon-linux-extras install epel -y.
sudo amazon-linux-extras install epel -y
sudo yum install ansible -y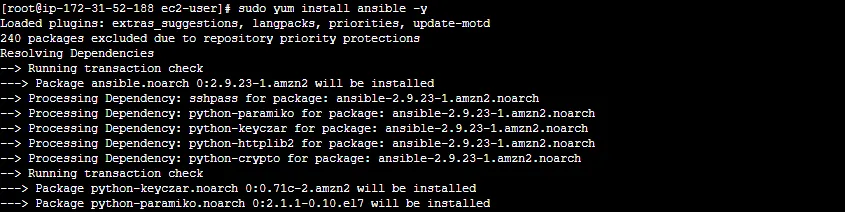
Step 4: Verify the Installation:
- Check Ansible’s version with ansible –version. You should see version information.

Step 5: Configure Ansible:
- Ansible looks for configuration files in
/etc/ansibleby default. - Modify these files to specify target server details, SSH user, and SSH key.
- Edit the hosts file with sudo vi /etc/ansible/hosts and add IP addresses or hostnames of target servers.
Step 6: Test Ansible:
- Run ansible all -m ping to verify Ansible can connect to target servers and execute commands.
Step 7: Create a Playbook File:
- Create a new playbook file, e.g., playbook.yml, with sudo vi /home/ec2-user/playbook.yml.
Step 8: Add Tasks to the Playbook:
- Define tasks in the playbook YAML file. For example, create a user, install a package, and add a line to a file.
Step 9: Run the Playbook:
- Execute the playbook with ansible-playbook /home/ec2-user/playbook.yml. Ansible will connect to target servers and perform tasks defined in the playbook.
By following these steps, you’ve successfully set up Ansible on an EC2 instance, created a playbook, and automated tasks on target servers. You can now use Ansible for more advanced automation and management tasks.
Hope you like this blog….
Tag – Ansible Zero to Hero – Ansible Zero to Hero

- What is Platform Engineering? A Beginner’s Guide - July 23, 2026
- Devops and Cloud Batch 12 Assignment - July 21, 2026
- Deploy a Java Application Using Ansible | Step-by-Step Guide - July 16, 2026