

How to Install Nexus Repository
Nexus is one of the most popular repository managers in the DevOps world. It allows you to store and retrieve build artifacts and also provides features to push and pull artifacts via CI and IDE integration tools such as Visual Studio and Jenkins.
There are two versions of Nexus repository manager: The commercial version and the open source version. It supports so many formats such PyPi, Docker, Yum, APT, Helm, npm, Go, R, and many more.
Using Nexus as a repository, allows your developers to get and manage packages on the centralized repository manager, which also gives the developers team a single source of truth for every package.
In this tutorial, we will explain how to install the Nexus Repository Manager on a Ubuntu 22.04 server. This tutorial also includes the installation of some packages such as Java OpenJDK and Nginx web server that will be used as a reverse proxy.
Prerequisites
Before you begin, you will need the following requirements:
- An Ubuntu 22.04 server.
- A non-root user with sudo/administrator enabled.
- A domain name pointed to your Ubuntu server IP address
(For production).
Installing Java Open-JDK 8
The Nexus Repository Manager required Java OpenJDK and JRE v8. The default Ubuntu repository provides multiple Java versions, So now you will install the Java OpenJDK and JRE v8 from the Ubuntu repository.
Before installing any package, run the apt command below to update and refresh your repositories package index.
$sudo apt update
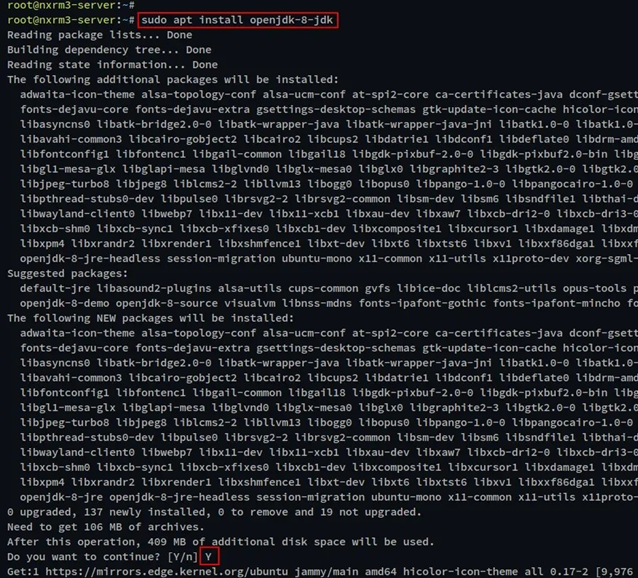
Now, install the Java OpenJDK 8 via the apt command below. Input Y when asked to confirm the installation and press ENTER to proceed.
$sudo apt install openjdk-8-jdk
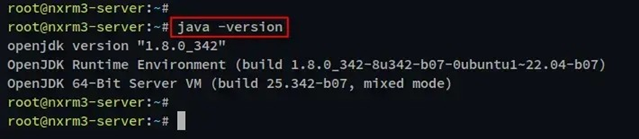
Once Java is installed, verify the Java version on your system using the following command.
$java -version
You will see the output in the following screenshot:
Setting up System
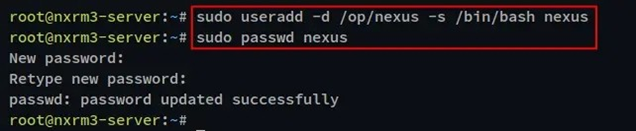
To install Nexus, you will need to create a new dedicated Linux user with a valid shell and also need to set up the max open files for both hard and soft limits to ‘65536‘.
Run the following command to create a new dedicated user for the Nexus with the name ‘nexus‘
$sudo useradd -d /opt/nexus -s /bin/bash nexus

$sudo passwd nexus
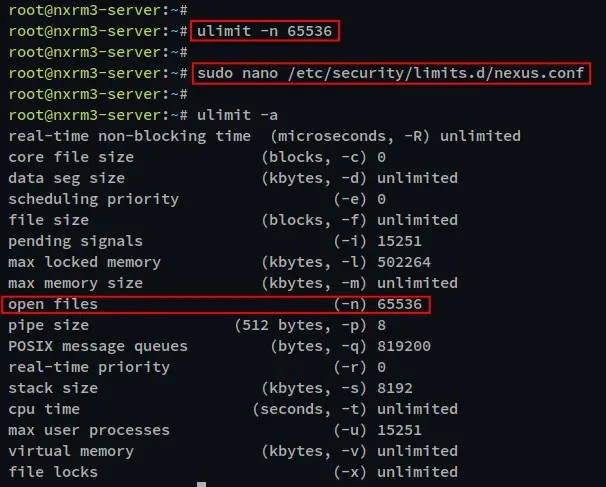
Next, set the ulimit to ‘65536‘ using the below command. This will only affect the system on the current system temporarily. To make it permanent, you can create a new config file that you will do in the next step.
Next, set the ulimit to ‘65536‘ using the below command. This will only affect the system on the current system temporarily. To make it permanent, you can create a new config file that you will do in the next step.
$ulimit -n 65536
TO set up ulimit permanently, create a new config file ‘/etc/security/limits.d/nexus.conf’ using nano editor.
$sudo nano /etc/security/limits.d/nexus.conf
Add the following configuration to the file. In this example, you are setting up ulimit for specific user ‘nexus‘ with the value ‘65536‘.
nexus - nofile 65536
Save the file and exit the editor when you are finished.
With all basic requirements in place and configured, you are ready to install the Nexus Repository Manager on your Ubuntu system.
Installing Nexus Repository Manager
The Nexus Repository Manager can be installed via the distribution package that you can download from the official Sonatype download page. At the time of this writing, the latest version of Nexus is v3.41.1. Now, you will download the nexus Repository Manager distribution package and configure the nexus installation.
Download the Nexus Repository Manager package via the wget command as below. If the download process is finished, you will see the file ‘nexus-3.41.1-01-unix.tar.gz’ on your current working directory.
$wget https://download.sonatype.com/nexus/3/nexus-3.41.1-01- unix.tar.gz
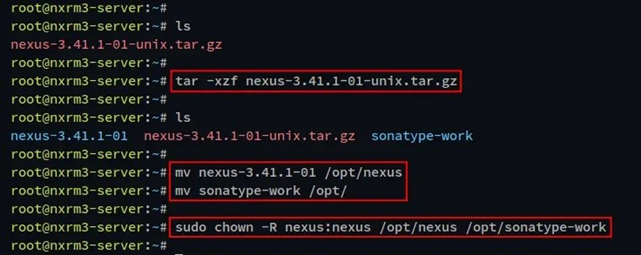
Now extract the file ‘nexus-3.41.1-01-unix.tar.gz‘ via the tar command below. And you should get two directories, the ‘nexus- 3.41.1-01‘ and ‘sonatype-work‘.
The directory ‘nexus-3.41.1-01‘ is the main directory for the Nexus package, and the directory ‘sonatype-work’ is the main working directory for Nexus.
$tar xzf nexus-3.41.1-01-unix.tar.gz
Next, move those extracted directories to ‘/opt’ using the following command. The Nexus package directory will be ‘/opt/nexus’ and the Nexus working directory will be ‘/opt/sonatype-work‘.
$sudo mv nexus-3.41.1-01 /opt/nexus

$sudo mv sonatype-work /opt/
Lastly, change the ownership of both directories to the user and group ‘nexus’ via the chown command below.
$sudo chown -R nexus:nexus /opt/nexus /opt/sonatype-work
Next, you will set up your Nexus installation by editing some of the Nexus configuration files.
Open the file ‘/opt/nexus/bin/nexus.rc’ using nano editor.
$sudo nano /opt/nexus/bin/nexus.rc
Uncomment the option ‘run_as_user‘ and change the value to ‘nexus’. With this configuration, you will be running the Nexus application as the system user ‘nexus‘.
run_as_user=”nexus”
Save the file and exit the editor when you are done.
Next, open the config file ‘/etc/nexus/bin/nexus.vmoptions’ using the nano editor to set up the max heap memory for Nexus.
$sudo nano /etc/nexus/bin/nexus.vmoptions
Change the default max memory heap for your Nexus installation in the following options. You can change the size to ‘1024m‘ based on the memory that you have on your server.
-Xms1024m

-Xmx1024m

-XX:MaxDirectMemorySize=1024m
Save the file and exit the editor when you are completed.
Now, edit the config file
'/opt/sonatype-work/nexus3/etc/nexus.properties' using the nano editor.
$sudo nano /opt/sonatype-work/nexus3/etc/nexus.properties
Uncomment the option ‘application-host’ option and change the value to ‘127.0.0.1‘. This means that you will be running the Nexus on localhost or IP address ‘127.0.0.1‘
application-host=127.0.0.1
Save the file and exit the editor. You now have the Nexus Repository Manager downloaded and configured. Next, you will set up a systemd service file for Nexus.
Running Nexus as SystemD Service
On a default installation, the Nexus Repository Manager can be run manually via the binary command ‘nexus’ that is available on the ‘/opt/nexus/bin’ directory. But, to make it easier for managing Nexus, you will set up a systemd service file for Nexus. Add the following configuration to the file.
Running Nexus with systemd service file, allows you to manage the nexus process via the systemctl command.
Now, create a new service file ‘/etc/systemd/system/nexus.service‘ using nano editor.
$sudo /etc/systemd/system/nexus.service
Add the following configuration to the file.
[Unit]

Description=nexus service After=network.target [Service]

Type=forking LimitNOFILE=65536

ExecStart=/opt/nexus/bin/nexus start ExecStop=/opt/nexus/bin/nexus stop User=nexus

Restart=on-abort [Install]

WantedBy=multi-user.target
Save the file and exit the editor when you are done.
Next, run the following command to reload the sytemd manager and apply a new service file for Nexus.
$sudo systemctl daemon-reload
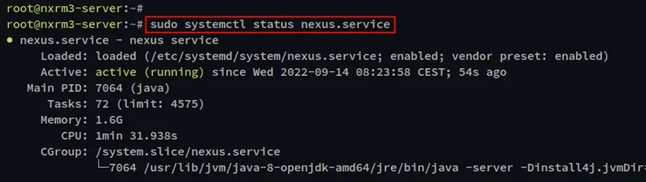
Start and enable the ‘nexus.service‘ via the systemctl command below. The Nexus Repository Manager will now start at the local IP address 127.0.0.1 with the default port ‘8081’. Also, the ‘nexus.service‘ will automatically run at system boot.
$sudo systemctl start nexus.service

$sudo systemctl enable nexus.service
With the Nexus running as a systemd service, you can now set up a reverse proxy for Nexus.
Running Nexus with Reverse Proxy
The Nexus Repository Manager is now running on the local IP address ‘127.0.0.1’ with the default port ‘8081’. To make it accessible from outside of the network, you will use the Nginx reverse proxy that will be running on standard HTTP/HTTPS ports.
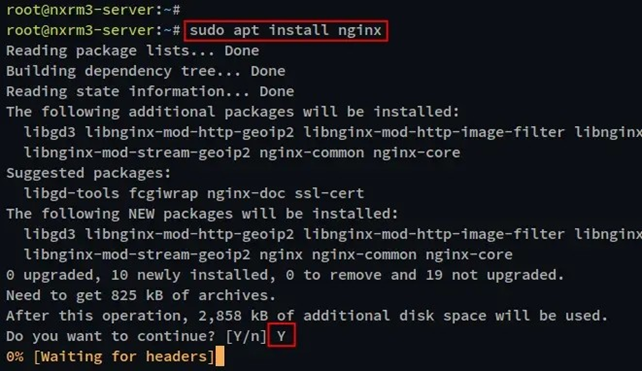
Run the following apt command to install the Nginx web server to your Ubuntu system. When prompted to confirm the installation, input Y and press ENTER to proceed.
$sudo apt install nginx
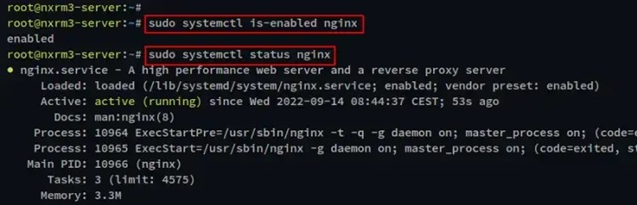
Once Nginx is installed, run the following systemctl command to check and verify the nginx service. You should see the nginx service is enabled and will be running automatically at system boot. And the status of the nginx service is running.
$sudo systemctl is-enabled nginx

$sudo systemctl status nginx
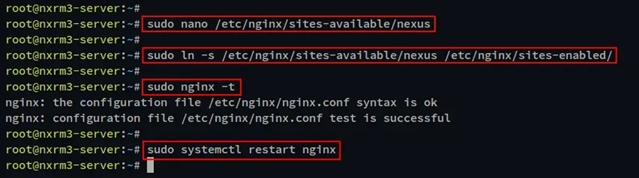
Next, create a new server block configuration ‘/etc/nginx/sites- available/nexus‘ using nano editor.
$sudo nano /etc/nginx/sites-available/nexus
Add the following Nginx configuration to the file and be sure to change the domain name.
upstream nexus3 {


}
server {
 	listen 80;
 	server_name nexus.hwdomain.io;
 	location / {
 	proxy_pass http://nexus3/;
 	proxy_http_version 1.1;
 	proxy_set_header Upgrade $http_upgrade;
 	proxy_set_header Connection "upgrade";
 	proxy_set_header Host $http_host;
 	proxy_set_header X-Real-IP $remote_addr;
 	proxy_set_header X-Forward-For
$proxy_add_x_forwarded_for;
 	proxy_set_header X-Forward-Proto http;
 	proxy_set_header X-Nginx-Proxy true;
 	proxy_redirect off;
}
}
Save the file and exit the editor.
Next, run the following command to activate the server block configuration for Nexus by creating a symlink of the config file to the ‘sites-enabled’ directory. Then, verify the Nginx configuration to make sure Nginx is configured properly.
$sudo ln -s /etc/nginx/sites-available/nexus /etc/nginx/sites- enabled/
$sudo nginx -t
If your Nginx configuration is configured properly, you should get the output message such as “test is successfull”.
Lastly, run the following command to restart the Nginx service and apply the new server block configuration for Nexus.
$sudo systemctl restart nginx
You have now set up the Nginx web server as a reverse proxy for Nexus Repository Manager on your Ubuntu machine. You can now access your Nexus installation via your domain name.
Installation of Nexus Repository Manager
At this point, the Nexus Repository manager is running under the Nginx reverse proxy. And it’s accessible via the domain name of your installation.
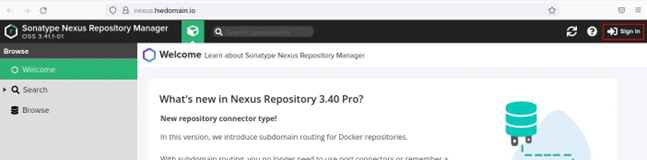
Open the web browser and visit the domain name of your Nexus installation (i.e: http://nexus.hwdomain.io). And you should get the default Nexus page as below.
Click on the “Sign In” button to log in to the Nexus admin dashboard.
The default admin password for Nexus is stored at the file ‘/opt/sonatype-work/nexus3/admin.properties‘ with the default username admin.
Back to your terminal and run the following command to get the default password for Nexus login. Then, copy the default password for Nexus.
$cat /opt/sonatype-work/nexus3/admin.properties
Next, input the user admin and paste the password for Nexus. Then, click “Sign In“.

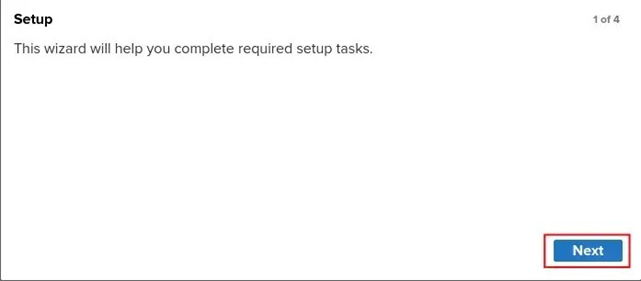
Now you will get the setup wizard of Nexus Repository Manager. Click “Next” to proceed.
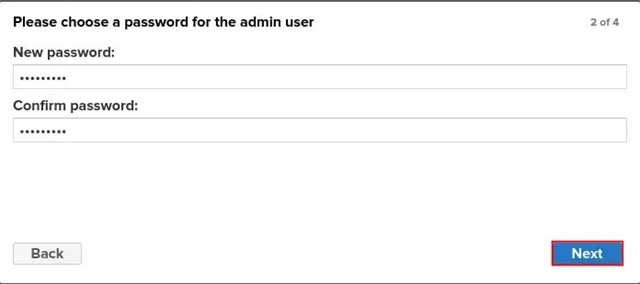
Input the new strong password for your Nexus installation and repeat. Then, click “Next” again.
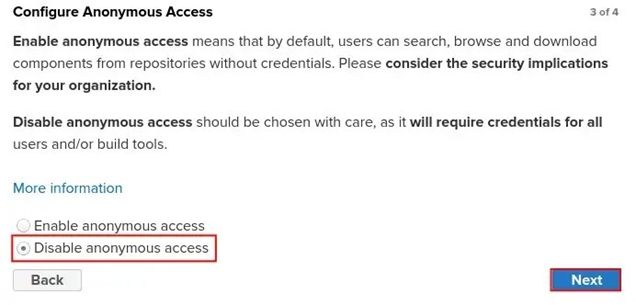
For the “Anonymous Access” configuration. Select the option “Disable anonymous access” and click “Next“.
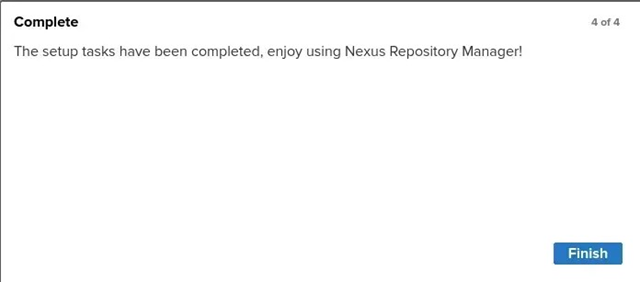
Now click “Finish” to complete the Nexus configuration.
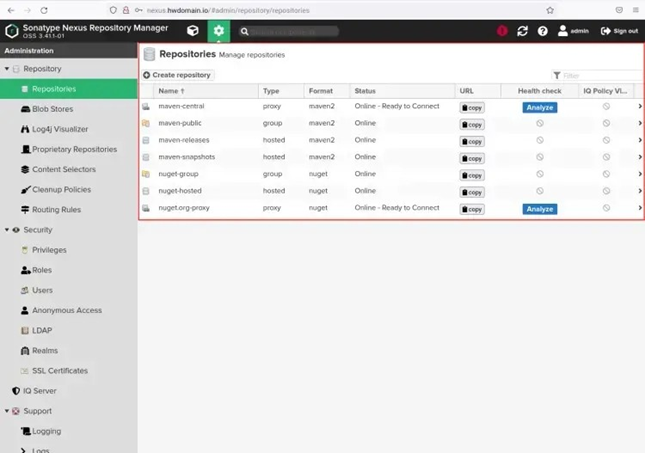
After the Nexus configuration is completed, you will now see the Nexus administration dashboard. In the below screenshot, you can see the Nexus Repository Manager.
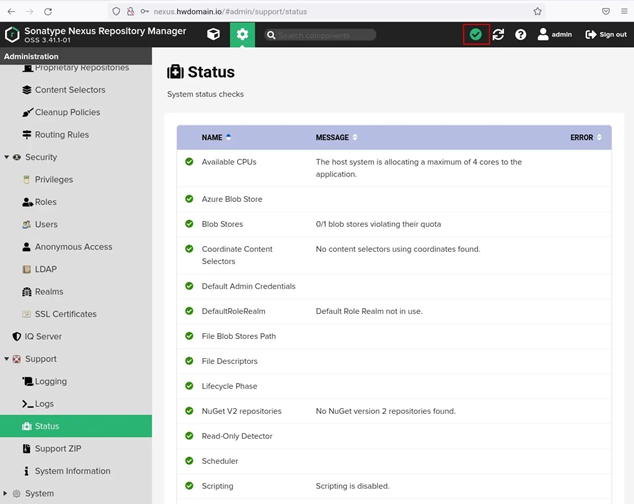
Lastly, verify your Nexus installation via the check status button on top. Now make sure all the system status is checked as green, which means Nexus installation and configuration successfully.
How to configure Nexus 3 as private Docker Registry | How to host private Docker Registry in Nexus 3
Sonatype-Nexus is one of the popular binary repository managers. It can be also used to store Docker images as well besides storing binaries such as WARs, EARs, Jars, DLLs and Exes
Pre-requisites:
- Make sure Nexus is successfully configured, it is up and running.
- Also do open port 8085 open as well besides port 8081 for Nexus.
- Docker is setup and running.
Steps to configure Nexus 3 as Docker Registry:
- Login to Nexus and click on Server Administration link at the top of the window. Click on Repositories.
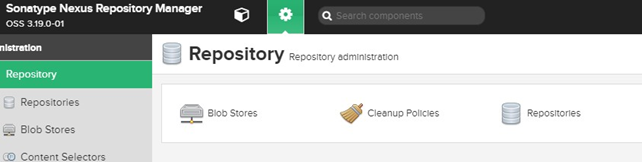
2. Now click on create repository
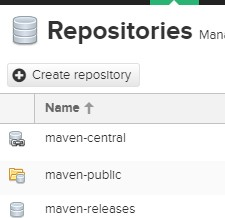
3. Choose docker hosted repository

4. Choose the value as mentioned:
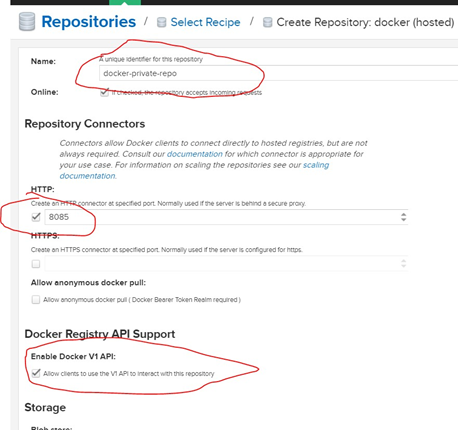
- Click on Create repository.
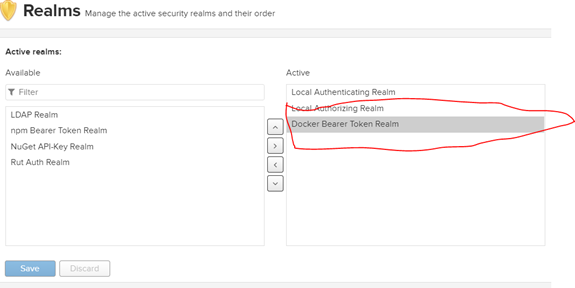
Configure Realm
- Move Docker Bearer Token realm to right by clicking on >
This settings allows docker repository to have anonymous read enabled.
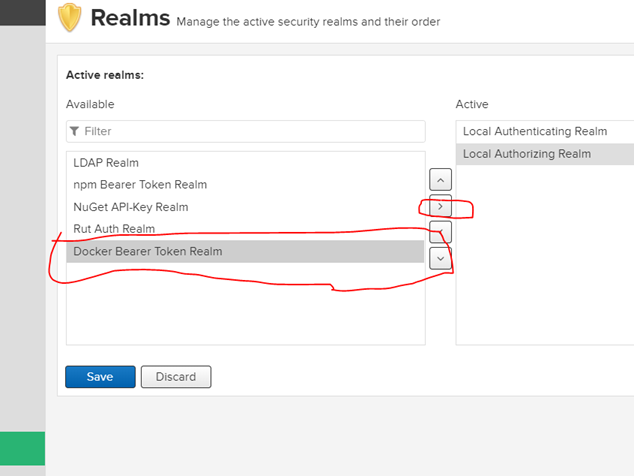
7. after moving save it.
How to upload Docker images into Nexus docker Registry | Upload Docker images to Nexus Decker Registry
How to upload Docker images into Nexus docker Registry – Upload Docker images to Nexus Decker Registry.
Pre-Requistes:
Make sure Docker is installed and up and running. Nexus is up and running and Docker registry is already is configured.
Steps to configure in Docker to upload Docker images to Nexus:
Configure Docker service to use insecure registry with http.Create Docker daemon file if it does not exist.
$sudo nano /etc/docker/daemon.json
Add entries like below:
Enter NExus URL along with port number used for Docker registery
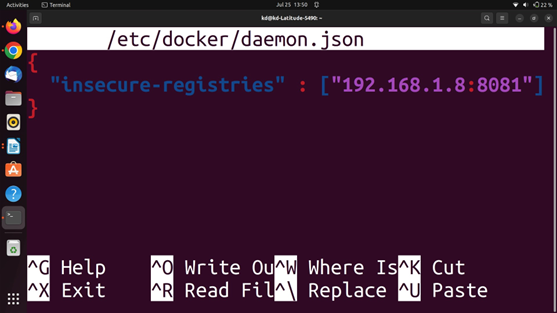
{
  "insecure-registries" : ["192.168.1.8:8081"]
}
Restart Docker daemon after above configuration changes.
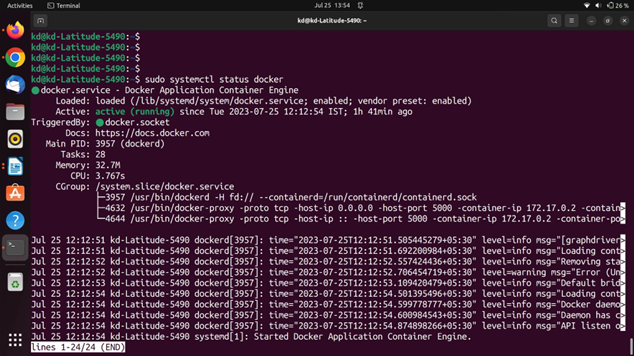
$sudo systemctl restart docker
Make sure Docker was able to restart successfully.
Login to Docker Registry hosted in Nexus 3
Make sure you are able to login to Docker Registry hosted in Nexus by executing below command:
$sudo docker login -u admin ip_address:8085
and then enter nexus admin password

Download Dockerized code from my repo
$git clone https://bitbucket.org/ananthkannan/mydockerrepo; cd mydockerrepo/pythonApp
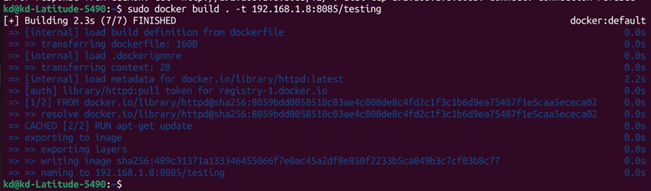
Create a Docker image and tag the image per Nexus Registry
$sudo docker build . -t ip_address:8085/mypythonimage
Push the image into Docker Registry
$sudo docker push ip_address:8085/mypythonimage

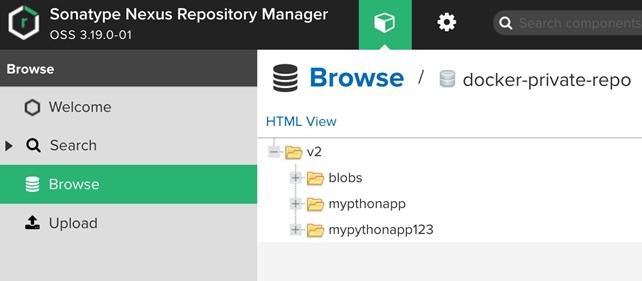
Verify in Nexus if images are uploaded
Login to Nexus, click on Browse, choose Docker registry
Hope you like this blog….

- Deployment of Spring Boot Application on Kubernetes Using Helm - July 19, 2024
- Robot Framework for Selenium Automation - July 14, 2024
- Pytest Framework (Selenium Automation) - July 14, 2024