

Jenkins setup –
Jenkins overview :
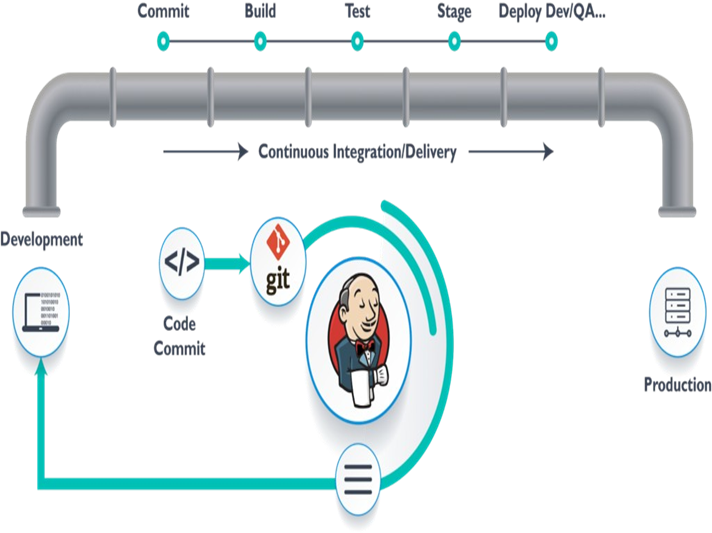
Jenkins is a free and open-source automation server. IT helps automate the parts of software development related to building, testing and deploying facilitating continuous integration and continuous delivery.
How Jenkins Works:
Jenkins runs as a server on a variety of platforms including Linux, Windows, Mascos, unix variants. It requires a Java 8 vm and can be run on the oracle JRE or open JDK. Jenkins runs as a Java servlet within a jetty application server.
Jenkins History:
The Jenkins project was started in 2004 (originally called Hudson) by kohsuke kawaguchi, while he worked for sun microsystem.
Kohsuke was a developer at sun and got tired of incurring the wrath of his team every time his code broke the build.
Features of Jenkins:
- Continuous integration and continuous delivery
- Easy installation
- Plugins
- Extensible
- Distributed
- Easy configuration
The pre-requisites for the installation of Jenkins.
1.Hardware Requirements
Resource Requirement
RAM 256 MB
Drive Space 1 GB (10 GB if Jenkins is running as a Docker container)
Resource Requirement RAM 1 GB
Drive Space 50 GB
Still, the call out is that these requirements will be different for each team depending on the team’s size, the parallel users of Jenkins, and the number of jobs running on the Jenkins server.
2.Software Requirements
The below table lists the minimum software requirements, which need to be present on a machine on which we are planning to install the Jenkins:
JAVA Java Development Kit (JDK) or Java Runtime Environment (JRE).
Web Browser Any of the browsers such as Google Chrome, Mozilla Firefox, Microsoft Internet Explorer, Microsoft Edge, Safari
Operating System
Jenkins supports almost all the modern operating systems such as Windows, macOS, Linux flavors such as Red Hat, Ubuntu, OpenSUSE, Gentoo, etc.
JENKINS INSTALLATION STEPS:
IMPORTANT: Make sure to remove any older installations before installing a new one.
Firstly check java is install or not, if java is not install then install the java version and then jenkins.
Step 1: To check java version
$java –version

Step 2:
$sudo snap install curl
Step 3:
$curl -fsSL https://pkg.jenkins.io/debian-stable/jenkins.io.key | sudo tee
/usr/share/keyrings/jenkins-keyring.asc > /dev/null
Step 4:
$echo deb [signed-by=/usr/share/keyrings/jenkins-keyring.asc] https://pkg.jenkins.io/debian-stable binary/ | sudo tee/etc/apt/sources.list.d/jenkins.list > /dev/null
Step 5:
$sudo apt update
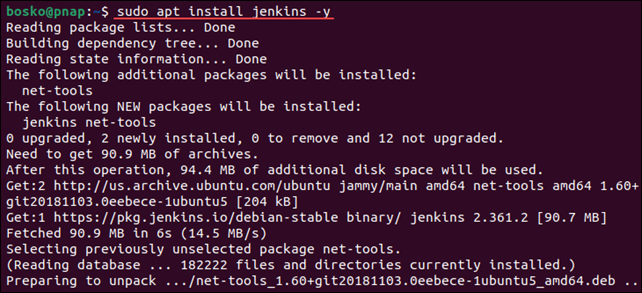
Step 6:
$sudo apt install jenkins -y
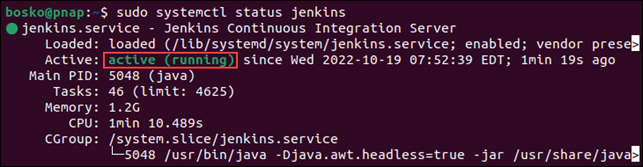
$sudo systemctl status jenkins
$sudo systemctl enable –now jenkins

if next step is not available then press ctrl+z
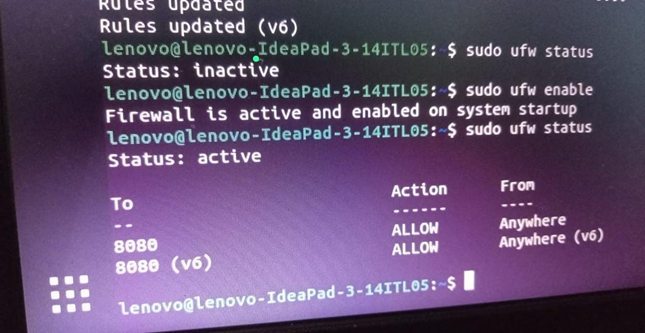
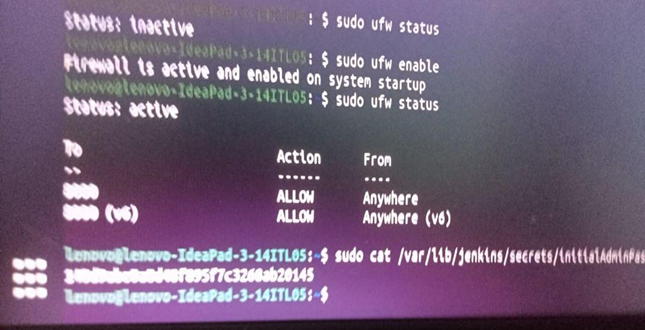
$sudo ufw allow 8080

$sudo ufw status

$sudo ufw enable

$sudo ufw status
Step 7:
open the browzer
http://localhost:8080
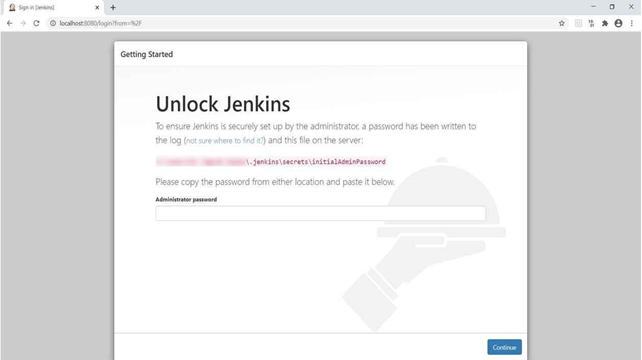
Step 8:
Open the terminal
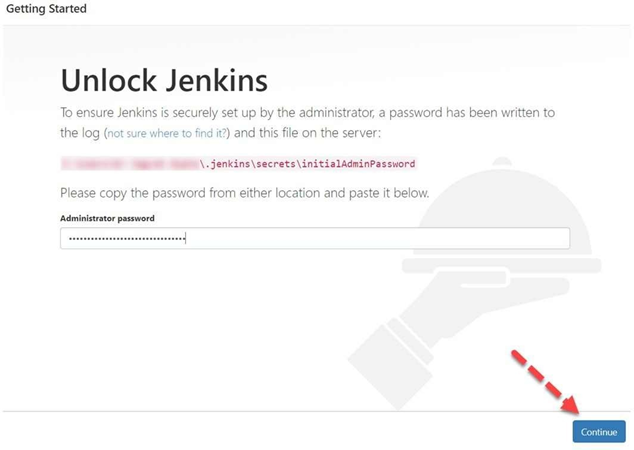
$ sudo cat varlib/jenkins/secrets/initialAdminPassword
Copy that password and paste it on Administrator Password.
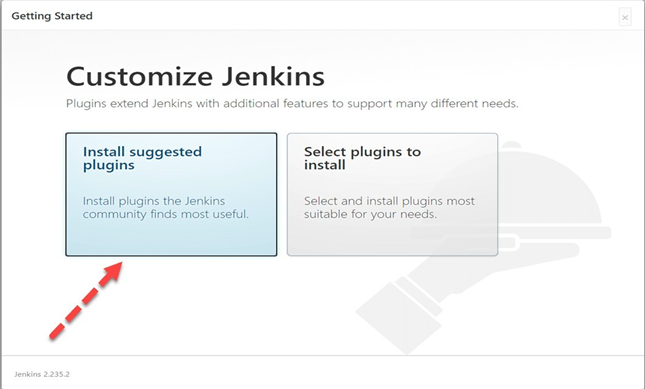
Step 9:
As soon as you click on the Continue button, you will be redirected to the page to suggest you install suggested plugins. After that, click on “Install suggested plugins”. Kindly note that if users want to install only selected plugins required, it is recommended to select the option ” Select plugins to install”.
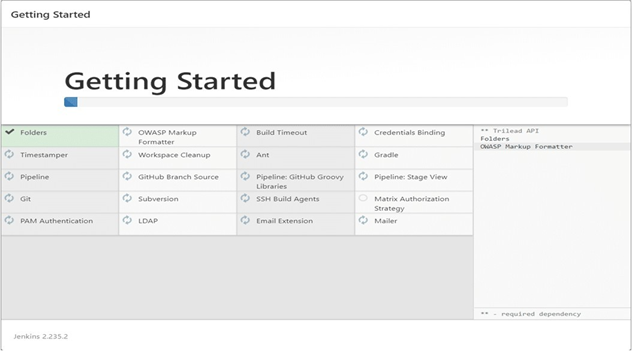
Step 10:
After clicking on the suggested plugin button, the standard plugin installation will be started automatically, as displayed in the below screen:
Step 11:
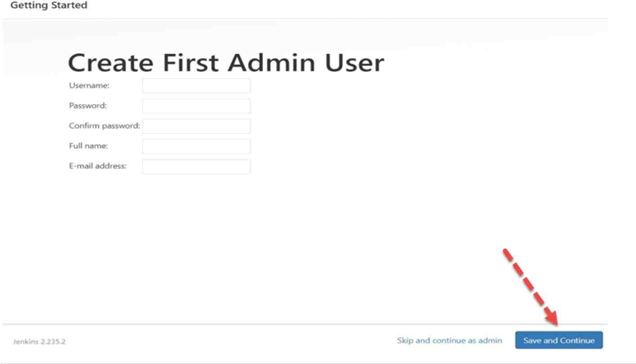
Finally, after installation of all suggested plugins, you will be redirected to the User Account Page like below:
step 12:
Here we need to do the following things:
- Put username, new password that you want to put.
- Put confirm password, full name, email address, and click on the “Save and Continue”
button.
- You can choose the option “Skip and continue as Admin” located beside the “Save and Continue” button, and in this case, you need to put the same password that you put in the previous steps. It is always recommended that you need to put in a new password according
to your choice.
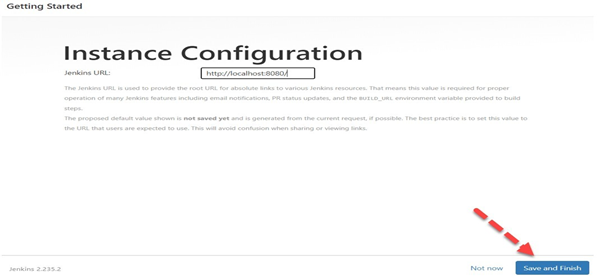
Step 13:
After clicking, you will be redirected to a new screen that will display a message like
“Jenkins is Ready”. Now click on the “Start using Jenkins” button.

step 14:
After clicking on the “Start using Jenkins ” button, you will be redirected to the Jenkins Dashboard.
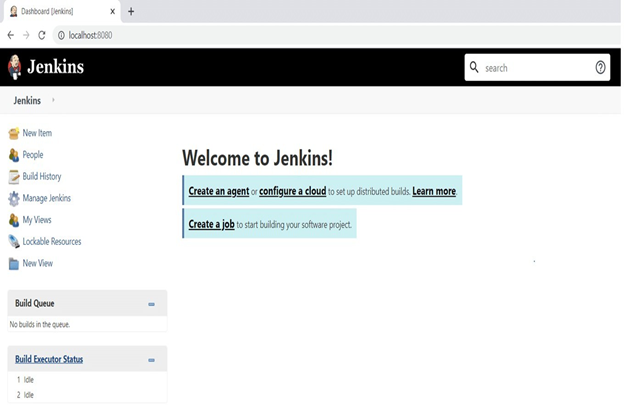
Here is the jenkins setup complete.
Hope you like this blog….

- ArgoCD Okta integration - July 2, 2026
- Jenkins Okta Integration - June 22, 2026
- Install Apache Tomcat using Ansible – Complete Guide - June 16, 2026