

Introduction:
Amazon Web Services (AWS) is one of the most popular cloud platforms used by organizations to host applications, websites, databases, and other IT infrastructure.
One of the most commonly used AWS services is Amazon EC2 (Elastic Compute Cloud). EC2 allows us to create virtual servers in the AWS Cloud.
In this blog, we will learn how to:
- Understand AWS EC2
- Launch an EC2 instance
- Configure the server
- Connect to the server using SSH
- Install Docker
- Verify the server
- Prepare the server for application deployment
1. What is an AWS EC2 Instance?
Amazon EC2 provides resizable virtual servers in the AWS Cloud.
An EC2 instance can be used to:
- Host websites
- Run backend applications
- Deploy Docker containers
- Run Jenkins
- Host Kubernetes components
- Run databases
- Build CI/CD environments
You can think of an EC2 instance as a virtual machine running inside AWS.
2. Prerequisites
Before creating an EC2 server, you should have:
- AWS account
- Internet connection
- Basic Linux knowledge
- SSH client
- Basic knowledge of AWS
For Linux/macOS, SSH is generally available through the terminal.
For Windows, you can use PowerShell, Windows Terminal, or tools such as PuTTY.
3. Login to AWS Console
Open the AWS Management Console and sign in to your AWS account.
After logging in:
AWS Console → EC2
Search for EC2 and open the EC2 service.
4. Choose a Region
AWS provides multiple geographical regions.
For example:
- Mumbai –
ap-south-1 - Singapore –
ap-southeast-1 - US East –
us-east-1
Choose the region closest to your users or application requirements.
For users in India, Mumbai (ap-south-1) is commonly used.
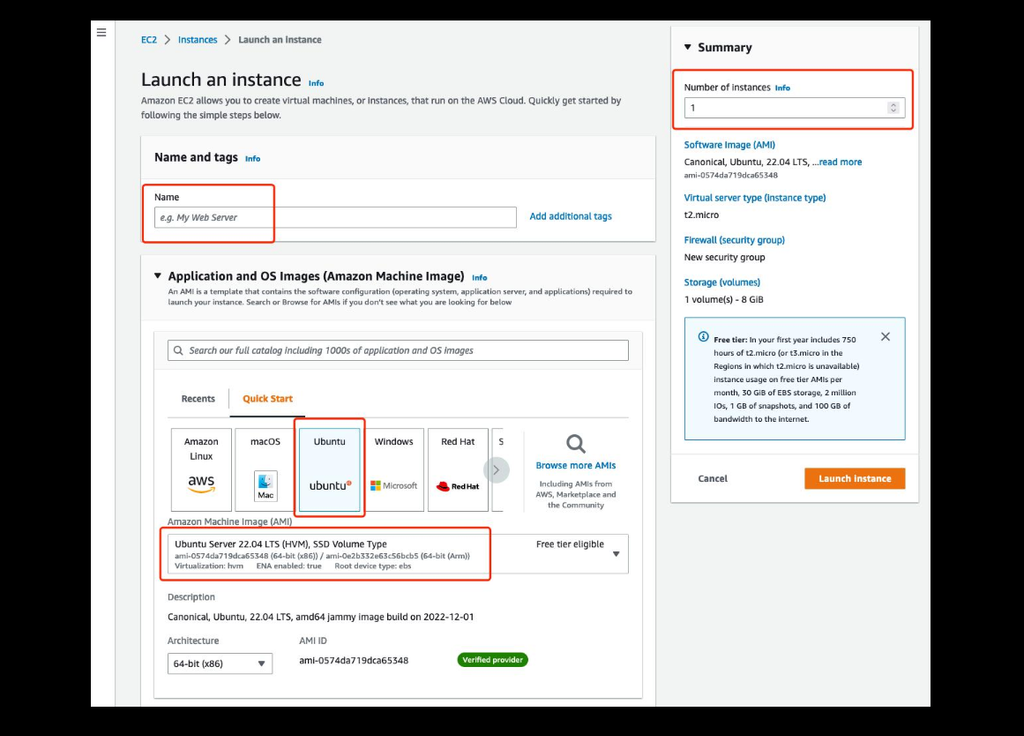
5. Launch an EC2 Instance
Go to:
EC2 → Instances → Launch Instance
Enter an instance name.
Example:
devops-server
5. Launch an EC2 Instance
Go to:
EC2 → Instances → Launch Instance
Enter an instance name.
Example:
devops-server
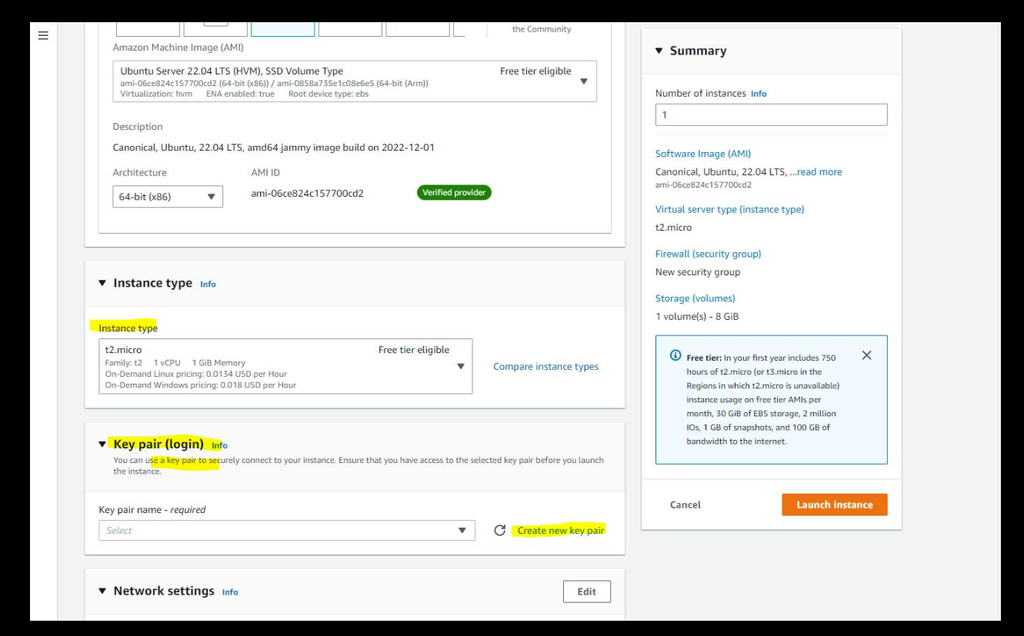
7. Choose Instance Type
Select an instance type according to your requirements.
For learning and testing purposes, you can choose a small instance that fits your AWS Free Tier eligibility or current AWS pricing.
Example:
t3.micro
Instance availability and Free Tier eligibility can vary by AWS account, region, and current AWS policies. Always verify the current pricing before launching resources.
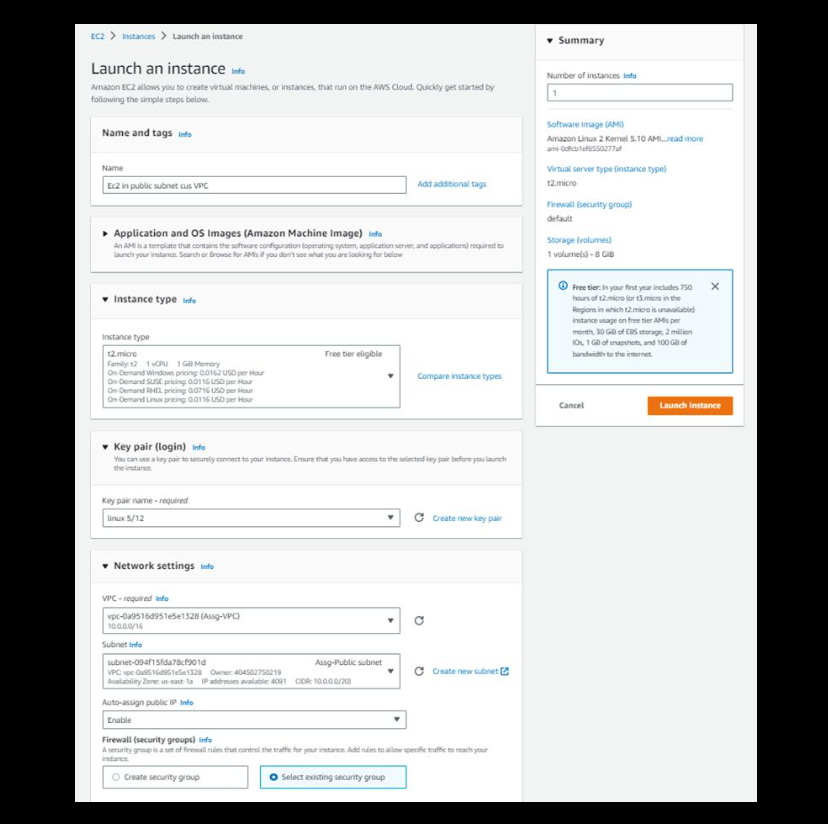
8. Create an SSH Key Pair
A key pair is required to securely connect to the EC2 server.
Click:
Create new key pair
Example:
devops-key
Choose:
RSA
For Linux/macOS, download the .pem file.
Keep this file secure.
Never share your private key with anyone.
9. Configure Network Settings
AWS automatically creates or uses networking components such as:
- VPC
- Subnet
- Security Group
For a basic learning environment, you can create a new security group.
Example:
Security Group Name:
devops-server-sg
10. Configure Security Group Rules
Security groups work like a virtual firewall.
For SSH:
Type: SSH
Protocol: TCP
Port: 22
Source: My IP
For a web application:
Type: HTTP
Protocol: TCP
Port: 80
Source: 0.0.0.0/0
For HTTPS:
Type: HTTPS
Protocol: TCP
Port: 443
Source: 0.0.0.0/0
For a custom application running on port 8080:
Type: Custom TCP
Port: 8080
Source: 0.0.0.0/0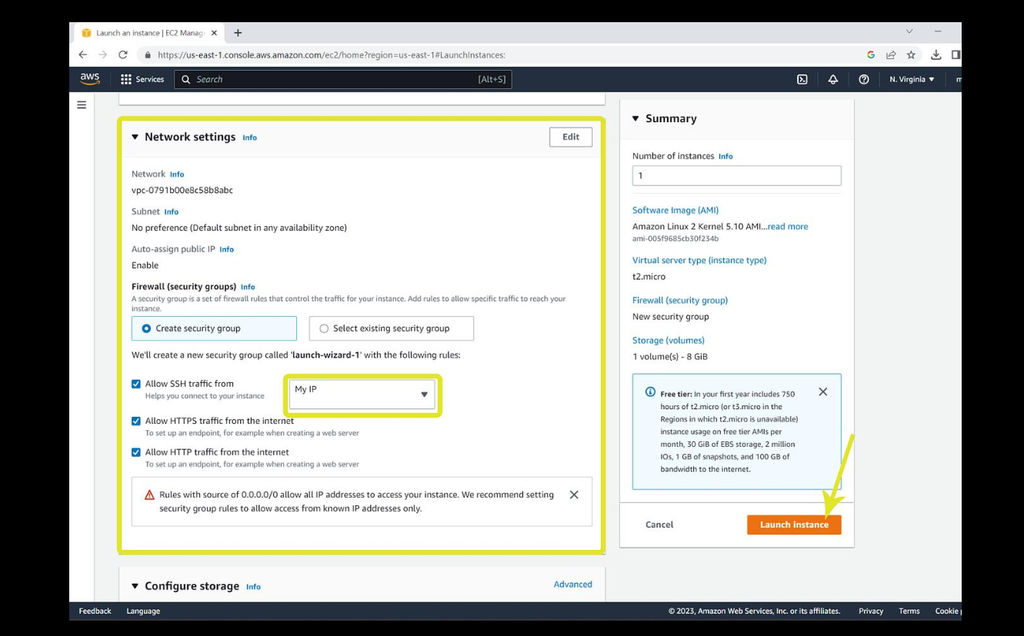
Security Recommendation
Do not expose unnecessary ports to the internet.
For SSH, My IP is safer than allowing:
0.0.0.0/0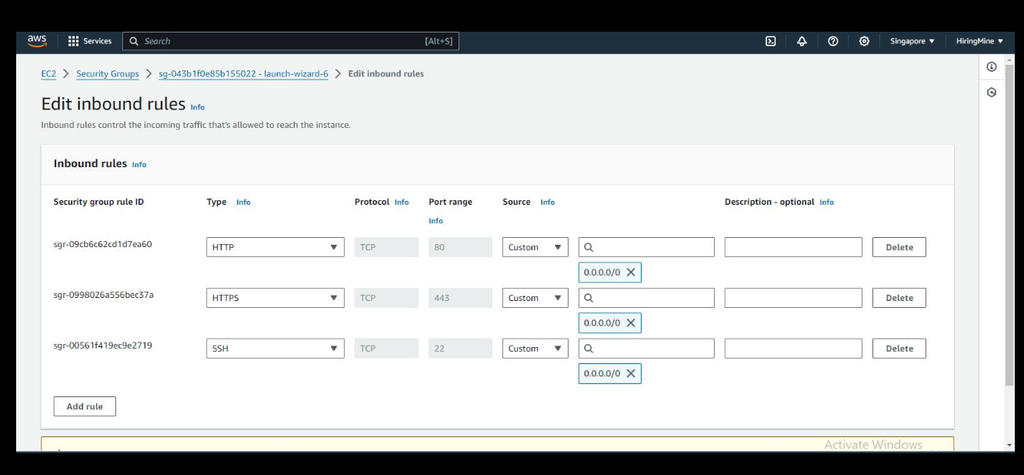
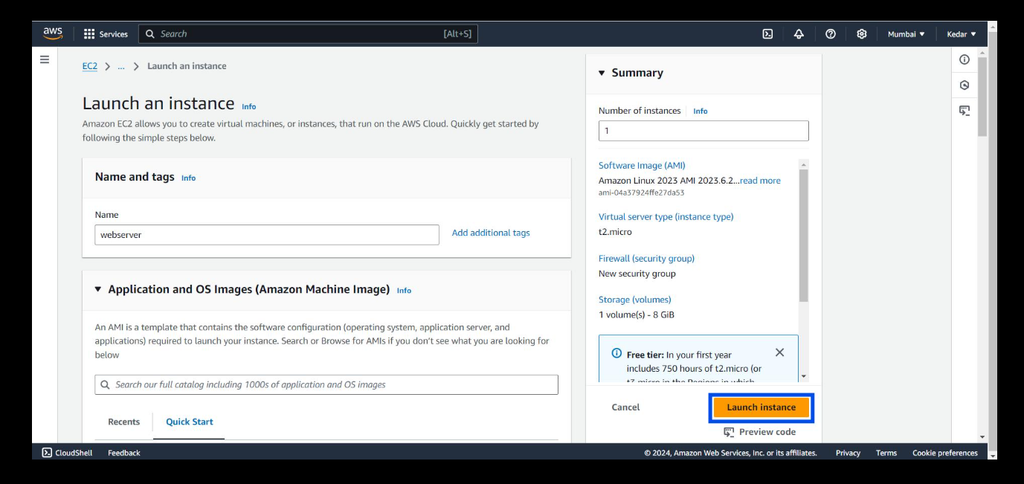
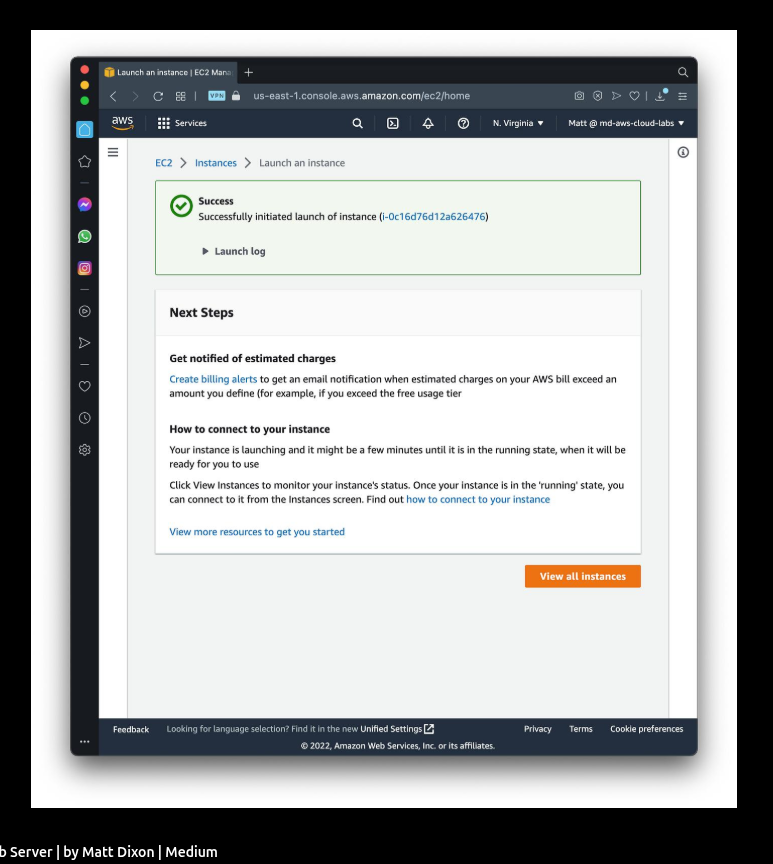
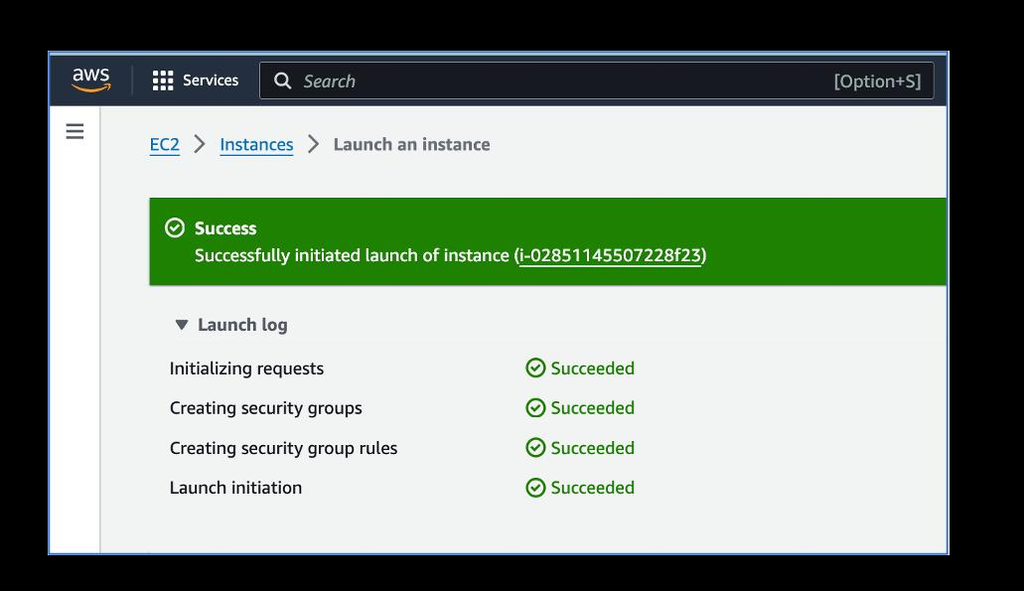
11. Launch the Instance
Review your configuration and click:
Launch Instance
AWS will create your EC2 server.
After a few moments, you should see the instance in:
EC2 → Instances
12. Find the Public IP Address
Select your EC2 instance.
You will find information such as:
- Instance ID
- Instance state
- Public IPv4 address
- Private IPv4 address
- Public IPv4 DNS
Example:
Public IPv4 Address:
13.XXX.XXX.XXX
We will use this IP address to connect to the server.
13. Connect to the EC2 Server
For Ubuntu, the default username is generally:
ubuntuFirst, move your key file to a secure location.
Then set the required permissions:
chmod 400 devops-key.pemNow connect:
ssh -i devops-key.pem ubuntu@<PUBLIC-IP>Example:
ssh -i devops-key.pem ubuntu@13.XXX.XXX.XXXIf the connection is successful, you will get a shell on the AWS server.
14. Verify the Server
Run:
whoamiOutput:
ubuntuCheck operating system:
cat /etc/os-releaseCheck hostname:
hostnameCheck IP information:
ip addrCheck disk space:
df -hCheck memory:
free -h15. Update the Server
Before installing software, update the package information:
sudo apt updateUpgrade installed packages:
sudo apt upgrade -y16. Install Git
Git is commonly required for application deployment.
sudo apt install git -yVerify:
git --version17. Install Docker
Install Docker using the official Docker installation method appropriate for your Ubuntu version.
After installation, verify:
docker --versionCheck Docker service:
sudo systemctl status dockerIf Docker is not running:
sudo systemctl start dockerEnable Docker at system startup:
sudo systemctl enable docker18. Run a Test Docker Container
Test Docker with:
sudo docker run hello-worldIf successful, Docker will download and run the hello-world image.
This confirms that Docker is working correctly.
19. Give the Ubuntu User Docker Permission
Instead of using sudo every time, add the Ubuntu user to the Docker group:
sudo usermod -aG docker $USERLog out and reconnect to the server.
Then verify:
docker ps20. Architecture
The basic architecture looks like this:
Developer
    |
    | SSH
    v
+----------------------+
|      AWS Cloud       |
|                      |
|   +--------------+   |
|   |     EC2      |   |
|   | Ubuntu Server|   |
|   +--------------+   |
|          |           |
|          v           |
|       Docker         |
|          |           |
|          v           |
|     Application      |
+---------------------
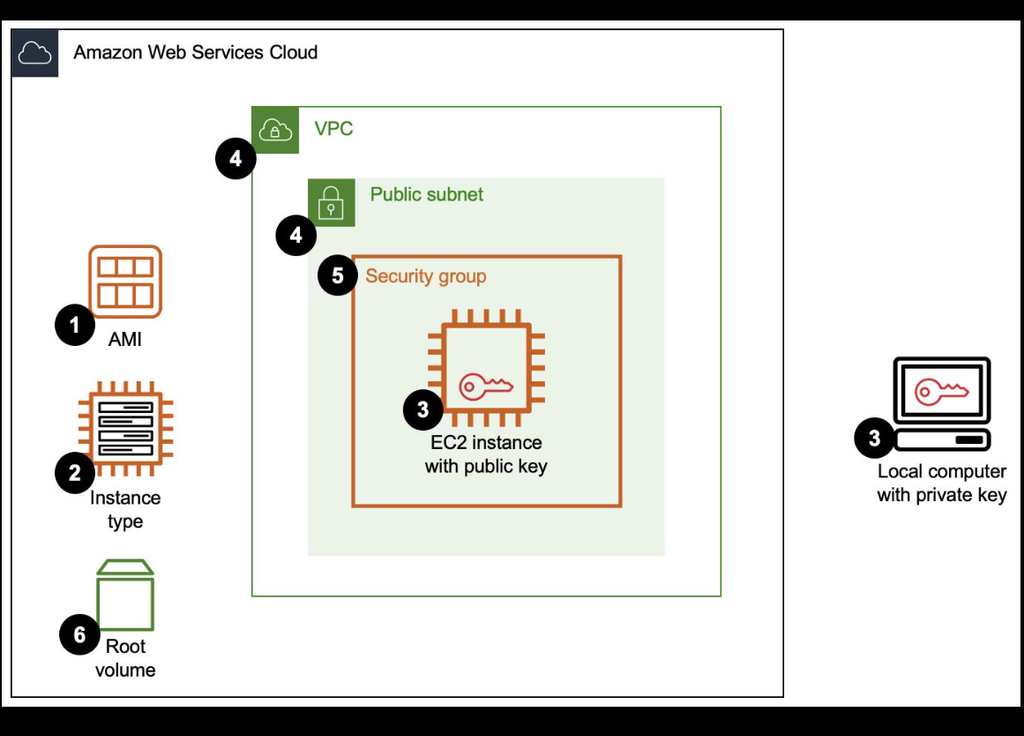
21. Important AWS Components
When working with EC2, you should understand these components:
EC2
Provides the virtual server.
AMI
Defines the operating system and initial software configuration.
Instance Type
Defines the compute resources such as:
- CPU
- Memory
- Network performance
Key Pair
Used for secure SSH authentication.
Security Group
Acts as a virtual firewall controlling inbound and outbound traffic.
VPC
Provides the networking environment for your AWS resources.
Public IP
Allows the server to communicate with the internet.
Conclusion
Amazon EC2 provides a simple and powerful way to create virtual servers in the AWS Cloud.
In this tutorial, we learned how to:
- Open AWS EC2
- Select a region
- Launch an Ubuntu server
- Create an SSH key pair
- Configure a security group
- Connect using SSH
- Update the server
- Install Git
- Install Docker
- Run a test Docker container

- How to Create a Server on AWS – Step-by-Step Guide for Beginners - September 2, 2026
- Helm GitOps Integration: A Complete Step-by-Step Guide for Beginners - August 6, 2026
- DevOps Engineer vs Platform Engineer vs Site Reliability Engineer (SRE) - August 4, 2026