
Introduction:
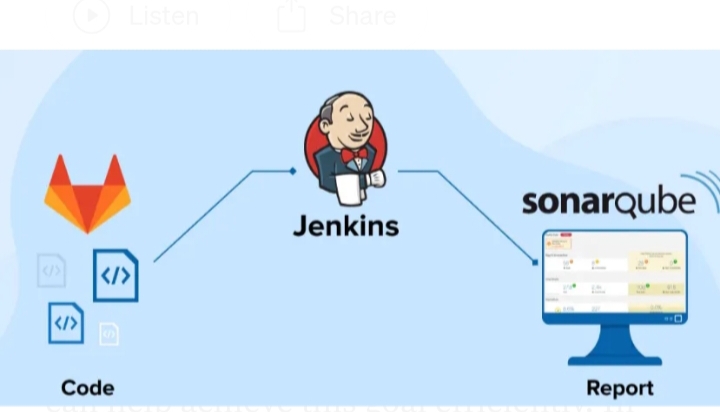
SonarQube is an open-source platform that continuously inspects code quality and security vulnerabilities in various programming languages. Integrating SonarQube with Jenkins enables automated code analysis during the build process, ensuring that only high-quality code is delivered.
How SonarQube Works:
- Source Code Upload: Developers push code to a version control system like Git.
- SonarQube Analysis: SonarQube runs an analysis on the code to detect issues.
- Report Generation: The analysis results are displayed in the SonarQube dashboard, highlighting issues like bugs, code smells, vulnerabilities, and code coverage.
- Actionable Insights: Developers use the reports to improve the code before deployment.
Prerequisites:
- SonarQube: Installed and running. Ensure you have administrative access.
- Jenkins: Installed and configured: Ensure you have administrative access.
- Maven or Gradle: Depending on your project, have either Maven or Gradle installed and configured in Jenkins.
- SonarQube Plugin for Jenkins: Installed in Jenkins.
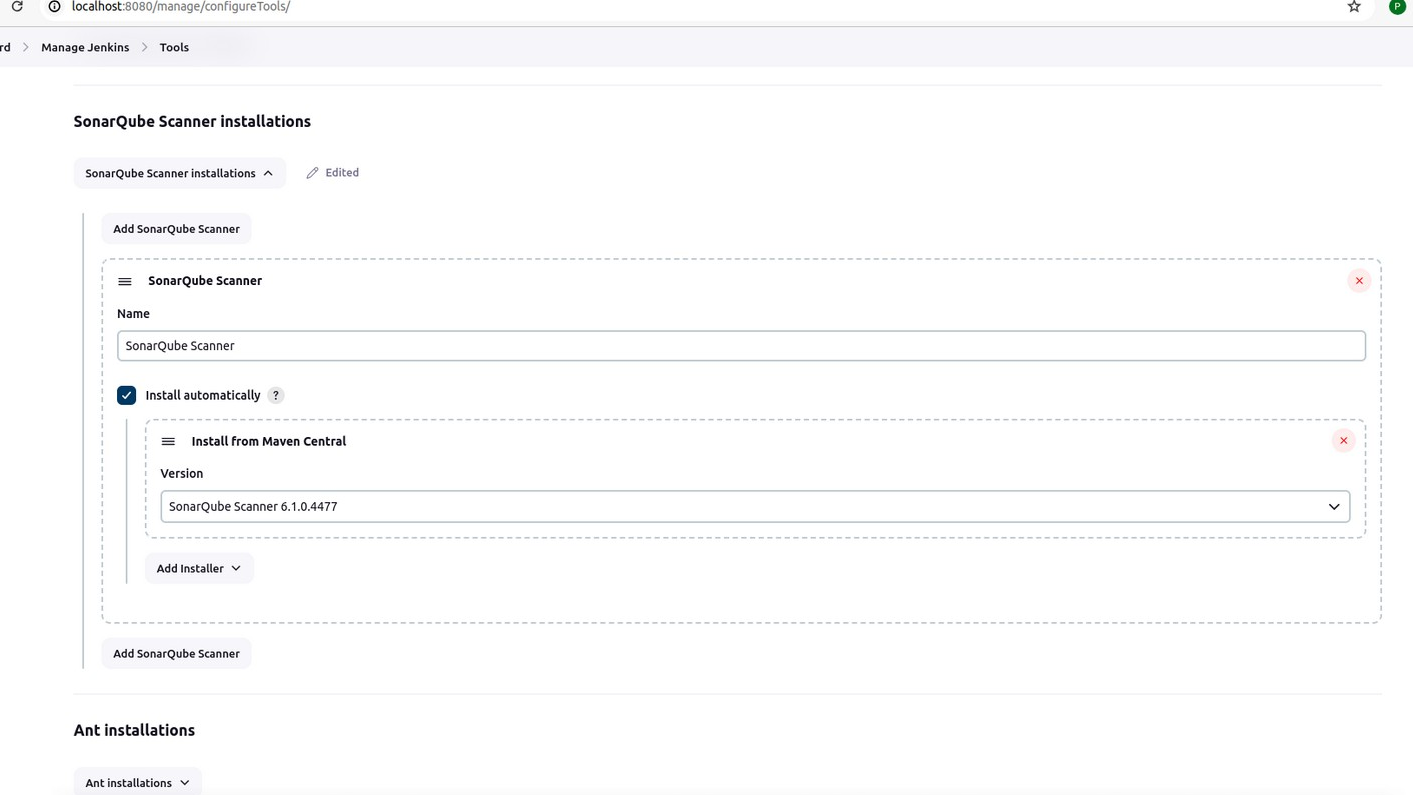
Step 1: Install SonarQube Scanner on Jenkins
1.Install the SonarQube Scanner Plugin:
- Go to Jenkins Dashboard > Manage Jenkins > Manage Plugins.
- Search for SonarQube Scanner in the Available tab.
- Install the plugin and restart Jenkins if required.
Configure SonarQube in Jenkins:
- Go to Jenkins Dashboard > Manage Jenkins > Configure System.
- Scroll down to the SonarQube servers section.
- Click on Add SonarQube.
• Enter the Name, Server URL, and authentication token.
- Name: A name to identify this SonarQube server.
- Server URL: URL of your SonarQube server (e.g.,http://your-sonarqube-server).
- Authentication Token: Use the token credential ID
- sonar_token (you can create a secret text credential in
- Jenkins and use its ID here).
- Click on Save to apply the settings.
Step-by-Step Guide to Create a SonarQube Token:
1. Login to SonarQube:
- Open your web browser and navigate to your SonarQube
- instance (e.g., http://your-sonarqube-server).Log in with your SonarQube credentials. You need to have
- sufficient permissions (typically an administrator or project-
- level admin) to create a token.
2. Access Your User Account Settings:
- After logging in, click on your user profile avatar or your
username in the top-right corner of the SonarQube dashboard. - From the dropdown menu, select My Account
3. Navigate to Security:
- In the My Account section, click on the Security tab on the left sidebar.
4. Generate a New Token:
- Under the Generate Tokens section, you will see an option to
- create a new token.
- • Provide a name for your token (e.g., Jenkins
- Integration Token). This name is just a label for you to
- recognize the token later.
- • Click the Generate button.
5. Copy the Token:
- Once the token is generated, it will be displayed on the screen.
- Copy the token immediately as it will only be shown once.
- Store this token securely, as you’ll need it to configure the
- SonarQube integration with Jenkins
6. Use the Token in Jenkins:
Go to your Jenkins dashboard.
- Navigate to Manage Jenkins > Manage Credentials.
- Add a new Secret text credential where the secret is the
SonarQube token you just generated. Assign an ID (e.g.,
sonar_token) that you can reference in your Jenkins
pipeline.

Step 2: Configure Jenkins Pipeline for SonarQube Analysis
- Modify Jenkinsfile: Add the SonarQube analysis steps in your jenkinsfile
pipeline {
    agent any
    tools {
        maven 'maven' // Ensure this matches the Maven name in Jenkins Global Tool Configuration
        jdk 'JDK 17' // Ensure this matches the JDK name in Jenkins Global Tool Configuration
    }
    environment {
        SONARQUBE_SERVER = 'SonarQube' // Ensure this matches the name given during SonarQube server configuration in Jenkins
        JAVA_HOME = "${tool 'JDK 17'}" // Set JAVA_HOME to the correct JDK path
        PATH = "${JAVA_HOME}/bin:${env.PATH}" // Add JAVA_HOME to the PATH
        SONAR_HOST_URL = 'http://localhost:9000' // Replace with your actual SonarQube server URL
        SONAR_LOGIN = 'sqp_e416b2afb062e02b47abcac20f29bb6a77092f72' // Retrieve SonarQube token from Jenkins credentials
    }
    stages {
        stage('Checkout') {
            steps {
                git url: 'https://github.com/pramilasawant/hellowordapplication.git', branch: 'main'
            }
        }
        stage('Build') {
            steps {
                dir('hellowordapplication') {
                    sh 'mvn clean install'
                }
            }
        }
        stage('SonarQube Analysis') {
            steps {
                withSonarQubeEnv('SonarQube') { // 'SonarQube' is the name of the SonarQube server configured in Jenkins
                    dir('hellowordapplication') {
                        sh """
                        mvn clean verify sonar:sonar \
                        -Dsonar.projectKey=hellowordapplication \
                        -Dsonar.host.url=${SONAR_HOST_URL} \
                        -Dsonar.login=${SONAR_LOGIN} \
                        -X
                        """
                    }
                }
            }
        }
        stage('Quality Gate') {
            steps {
                waitForQualityGate abortPipeline: true
            }
        }
    }
    post {
        success {
            echo 'Build and SonarQube analysis succeeded.'
            slackSend(channel: '#builds', message: "SUCCESS: Build and SonarQube analysis succeeded.")
        }
        failure {
            echo 'Build or SonarQube analysis failed.'
            slackSend(channel: '#builds', message: "FAILURE: Build or SonarQube analysis failed.")
        }
    }
}
- withSonarQubeEnv: Configures the environment to use the SonarQube instance.
- waitForQualityGate: Ensures that the pipeline waits for the analysis report. The pipeline fails if the quality gate does not pass.
2. Trigger a Build:
- Trigger a build on Jenkins for your project. The build process
will include running SonarQube analysis. - After the build, navigate to the SonarQube dashboard to review
the analysis results.
Step 3: Setting up Quality Gates in SonarQube
1. Login to SonarQube:
- Go to your SonarQube instance and log in with an admin
account.
2. Create or Customize Quality Gates:
- Go to Quality Gates in the main menu.
- Create a new quality gate or edit an existing one.
- Add conditions (e.g., code coverage, critical issues,
- duplications) that must be met for the gate to pass.
3. Assign Quality Gates to Projects:
- Assign the quality gate to your specific project by going to the
project’s administration page in SonarQube. - Select the desired quality gate from the Quality Gate
section.
Step 4: Verifying Integration
1. Review Jenkins Build:
- After running a Jenkins build, verify that the SonarQube
analysis has been executed. - Check the Quality Gate step to ensure the pipeline adheres
to the set quality standards.
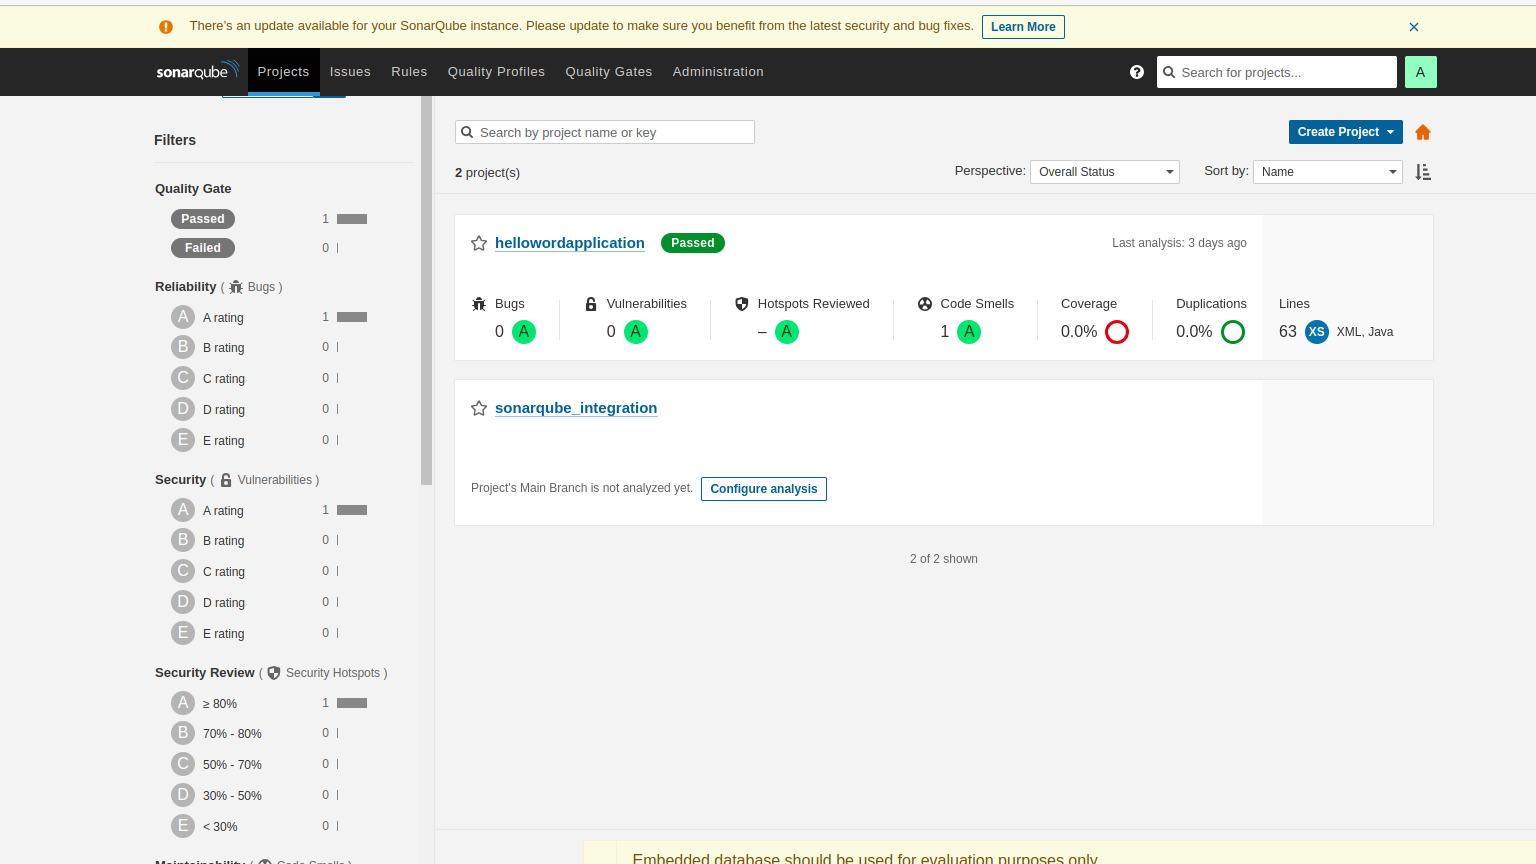
2 .Check SonarQube Dashboard:
- Navigate to the SonarQube dashboard for your project and
review the analysis. - Ensure that the quality gate results are reflected and that your
Jenkins pipeline behaves accordingly.

Admin at DevOpsLover.com
Mahesh Wabale is the admin & author of this blog, Technology enthusiast with interest in DevOps, CICD, Spring Boot, Microservices Architecture He has more than 7 years of experience in IT industry, programming language and development stuff. He loves to share his experience with his blog.
Latest posts by Mahesh Wabale (see all)
- Jenkins Okta Integration - June 22, 2026
- Install and Configure Apache Tomcat Using Ansible - June 16, 2026
- Docker Container Monitoring Dashboard using Prometheus and Grafana - June 15, 2026